react 项目中如何优雅的使用 svg
背景: 以前 vue 项目中使用 svg-sprite-loader 来处理 svg 文件使用非常方便,加载 svg 文件,配置完定义全局组件就好了,最近在写 react 项目,如法炮制,把 vue 中使用 svg 的思路带到 react 中来,实现的效果同样是只要把 svg 文件放到指定文件夹下使用文件名称结合 react 组件就可以使用。
项目环境:create-react-app:3.0.0 react:16.8.6 react-router-dom:5.0.0
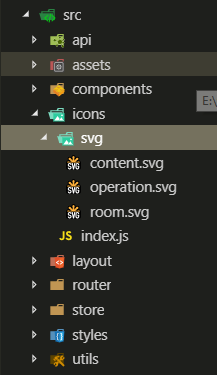
项目目录
使用步骤如下:
1.安装 svg-sprite-loader
1 | yarn add svg-sprite-loader --dev |
or
1 | npm i svg-sprite-loader -D |
2.配置 /config/webpack.config.js (yarn eject 后的配置 )
注意:新添加的 loader 一定要放到 file-loader 之前
原因:webpack 的 loader 执行是从后往前执行的
loader 里添加如下配置
1 | { |
2 | test: /\.(eot|woff2?|ttf|svg)$/, |
3 | exclude: path.resolve(__dirname, "../src/icons"), //不处理指定svg的文件(所有使用的svg文件放到该文件夹下) |
4 | use: [ |
5 | { |
6 | loader: "url-loader", |
7 | options: { |
8 | name: "[name]-[hash:5].min.[ext]", |
9 | limit: 5000, // fonts file size <= 5KB, use 'base64'; else, output svg file |
10 | outputPath: "font", |
11 | publicPath: "font" |
12 | } |
13 | } |
14 | ] |
15 | }, |
16 | |
17 | { |
18 | test: /\.svg$/, |
19 | loader: "svg-sprite-loader", |
20 | include: path.resolve(__dirname, "../src/icons"), //只处理指定svg的文件(所有使用的svg文件放到该文件夹下) |
21 | options: { |
22 | symbolId: "icon-[name]" //symbolId和use使用的名称对应 <use xlinkHref={"#icon-" + iconClass} /> |
23 | |
24 | } |
25 | }, |
3.src 文件夹下新建一个 icons 文件夹
icons 文件夹下新建 svg 文件夹放 svg 文件
目录

index.js 加载所有 svg 文件夹下 svg 文件
1 | const requireAll = requireContext => requireContext.keys().map(requireContext); |
2 | const svgs = require.context("./svg", false, /\.svg$/); |
3 | requireAll(svgs); |
然后一定要在 react 入口文件 src/index.js 中导入 src/icons/index.js
代码如下
1 | import "./icons"; |
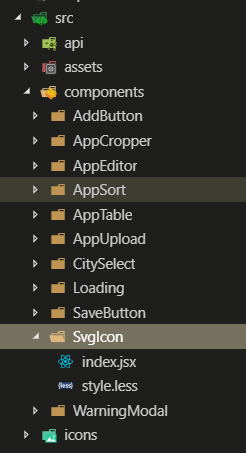
4.SvgIcon 组件
src/components 文件夹下建一个 SvgIcon 文件夹 添加 index.jsx 文件
目录

index.jsx 组件内容如下:
1 | import React from "react"; |
2 | import PropTypes from "prop-types"; |
3 | import styles from "./style.less"; //已启用 CSS Modules |
4 | |
5 | const SvgIcon = props => { |
6 | const { iconClass, fill } = props; |
7 | |
8 | return ( |
9 | <i aria-hidden="true" className="anticon"> |
10 | <svg className={styles["svg-class"]}> |
11 | <use xlinkHref={"#icon-" + iconClass} fill={fill} /> |
12 | </svg> |
13 | </i> |
14 | ); |
15 | }; |
16 | |
17 | SvgIcon.propTypes = { |
18 | // svg名字 |
19 | iconClass: PropTypes.string.isRequired, |
20 | // 填充颜色 |
21 | fill: PropTypes.string |
22 | }; |
23 | |
24 | SvgIcon.defaultProps = { |
25 | fill: "currentColor" |
26 | }; |
27 | |
28 | export default SvgIcon; |
style.less
1 | .svg-class { |
2 | display: inline-block; |
3 | overflow: hidden; |
4 | font-size: 14px; |
5 | min-width: 14px; |
6 | width: 1em; |
7 | height: 1em; |
8 | } |
5.使用
把要使用的的 svg 文件放到 src/icons/svg 目录下,使用的时候把 svg 名称给 iconClass 即可
1 | import React from "react"; |
2 | import SvgIcon from "@/components/SvgIcon"; |
3 | |
4 | const Demo = () => { |
5 | const svgName = "content"; // content.svg 已经放到 /src/icons/svg/ 目录下 |
6 | |
7 | return <SvgIcon iconClass={svgName} />; |
8 | }; |
9 | |
10 | export default Demo; |
