手写一个自己的 cli 并发布到 npm 上
简介:大家平时肯定用过 vue-cli 或者 create-react-app,只需要敲简单的命令行,就可以生成一个完整的项目,非常好用。由于本人所在公司接的项目较多,每次新建新项目都是拷贝以前的项目代码,好麻烦,而且得删除掉好多没用的代码,心累。于是就想着模仿 vue-cli 写一个简单的创建项目的 cli,这样不是就省心省力了嘛。于是说干就干,自己写了一个 cli:vea-cli,大家也可以使用,只要执行以下命令就好,如下
1 | npm install vea-cli -g |
2 | vea-cli init project-name |
下面是实现步骤
1.项目依赖:(先安装,步骤略)
1 | "dependencies": { |
2 | "chalk": "^3.0.0", |
3 | "commander": "^4.0.1", |
4 | "download-git-repo": "^3.0.2", |
5 | "inquirer": "^7.0.1", |
6 | "ora": "^4.0.3" |
7 | }, |
8 | "devDependencies": { |
9 | "eslint": "^6.8.0", |
10 | "eslint-config-standard": "^14.1.0", |
11 | "eslint-plugin-import": "^2.19.1", |
12 | "eslint-plugin-node": "^11.0.0", |
13 | "eslint-plugin-promise": "^4.2.1", |
14 | "eslint-plugin-standard": "^4.0.1" |
15 | } |
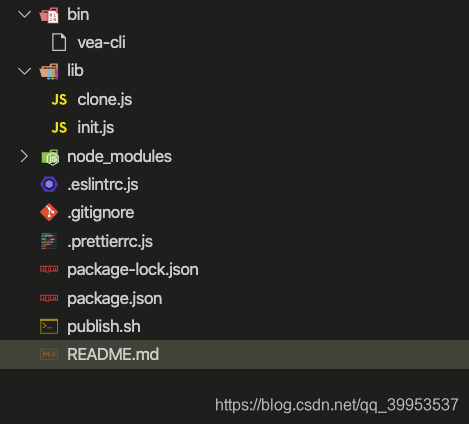
2.项目目录结构
3.核心代码
/bin/vea-cli (无文件扩展名)
1 | // 告诉执行环境用node来执行 |
2 | |
3 | |
4 | // 添加命令的库 |
5 | const program = require('commander') |
6 | |
7 | // 拿到package.json 里的版本号 |
8 | const packageJson = require('../package.json') |
9 | const init = require('../lib/init') |
10 | |
11 | // 执行 vea-cli -V 会输出版本号 |
12 | program.version(packageJson.version) |
13 | |
14 | // 添加init命令,简写是i, <name> 是参数 action回调里可以拿到 |
15 | program |
16 | .command('init <name>') |
17 | .alias('i') |
18 | .description('vue admin 项目初始化工具') |
19 | .action(name => { |
20 | init(name) |
21 | }) |
22 | |
23 | // 解析命令行参数 |
24 | program.parse(process.argv) |
lib/clone.js
1 | // node的 util 模块 promisify可以把回调promise化 |
2 | const { promisify } = require("util"); |
3 | |
4 | // 进度显示工具 |
5 | const ora = require("ora"); |
6 | |
7 | // 颜色显示工具 |
8 | const chalk = require("chalk"); |
9 | |
10 | // 下载git 仓库代码工具 |
11 | const download = promisify(require("download-git-repo")); |
12 | |
13 | /** |
14 | * |
15 | * @param {string} repo 仓库地址 |
16 | * @param {string} dir 文件夹 |
17 | * @param {object} opotions 配置项 |
18 | */ |
19 | const clone = async function(repo, dir, opotions = {}) { |
20 | const process = ora(`开始下载 ${chalk.blue(repo)}`); |
21 | process.start(); |
22 | process.color = "yellow"; |
23 | process.text = `正在下载..... ${chalk.yellow(repo)} `; |
24 | |
25 | try { |
26 | await download(repo, dir, opotions); |
27 | process.color = "green"; |
28 | process.text = `下载成功 ${chalk.green(repo)} `; |
29 | process.succeed(); |
30 | } catch (error) { |
31 | process.color = "red"; |
32 | process.text = "下载失败"; |
33 | process.fail(); |
34 | } |
35 | }; |
36 | |
37 | module.exports = clone; |
lib/init.js
1 | const chalk = require("chalk"); |
2 | |
3 | // 用户与命令行交互的工具 |
4 | const Prompt = require("inquirer"); |
5 | |
6 | const clone = require("./clone"); |
7 | |
8 | // 对应github仓库地址https://github.com/l-x-f/admin-template |
9 | // #dev 是dev分支,不写默认master分支 |
10 | const remote = "github:l-x-f/admin-template#dev"; |
11 | |
12 | const initQuestions = name => [ |
13 | { |
14 | type: "confirm", |
15 | name: "isInit", |
16 | message: `确定要在${chalk.green(name)}文件夹下创建项目?`, |
17 | prefix: "?" |
18 | } |
19 | ]; |
20 | |
21 | const init = async name => { |
22 | try { |
23 | const { isInit } = await Prompt.prompt(initQuestions(name)); |
24 | if (isInit) { |
25 | await clone(remote, name); |
26 | } else { |
27 | console.log(chalk.red("程序提前结束")); |
28 | } |
29 | } catch (error) { |
30 | console.log(chalk.red(error)); |
31 | } |
32 | }; |
33 | |
34 | module.exports = init; |
package.json
重点是 bin 字段的配置
1 | { |
2 | "name": "vea-cli", |
3 | "version": "1.0.1", |
4 | "description": "vue element-ui admin 项目初始化工具", |
5 | "main": "index.js", |
6 | "scripts": { |
7 | "test": "echo \"Error: no test specified\" && exit 1" |
8 | }, |
9 | "bin": { |
10 | "vea-cli": "./bin/vea-cli" |
11 | }, |
12 | "keywords": [ |
13 | "vue", |
14 | "vue-cli", |
15 | "vea-cli", |
16 | "vue element-ui admin 项目初始化工具" |
17 | ], |
18 | "author": "xiaofei", |
19 | "license": "MIT", |
20 | "dependencies": { |
21 | "chalk": "^3.0.0", |
22 | "commander": "^4.0.1", |
23 | "download-git-repo": "^3.0.2", |
24 | "inquirer": "^7.0.1", |
25 | "ora": "^4.0.3" |
26 | }, |
27 | "devDependencies": { |
28 | "eslint": "^6.8.0", |
29 | "eslint-config-standard": "^14.1.0", |
30 | "eslint-plugin-import": "^2.19.1", |
31 | "eslint-plugin-node": "^11.0.0", |
32 | "eslint-plugin-promise": "^4.2.1", |
33 | "eslint-plugin-standard": "^4.0.1" |
34 | } |
35 | } |
4.本地测试
在项目根目录下执行 npm link 会把vea-cli命令链接到全局
npm unlink vea-cli 可以删除掉
执行就可以看到效果
1 | vea-cli init project-name |
5.发布到 npm 上 (自行注册账号)
项目根目录下新建 publish.sh
1 | |
2 | set -e |
3 | |
4 | # 修改npm源地址 |
5 | npm config get registry |
6 | npm config set registry=http://registry.npmjs.org |
7 | |
8 | # 登陆输入自己的npm账号和密码,还有邮箱 |
9 | echo '登录' |
10 | npm login |
11 | |
12 | echo "发布中..." |
13 | npm publish |
14 | |
15 | # 改回npm源地址 |
16 | npm config set registry=https://registry.npm.taobao.org |
17 | echo -e "\n发布成功\n" |
18 | exit |
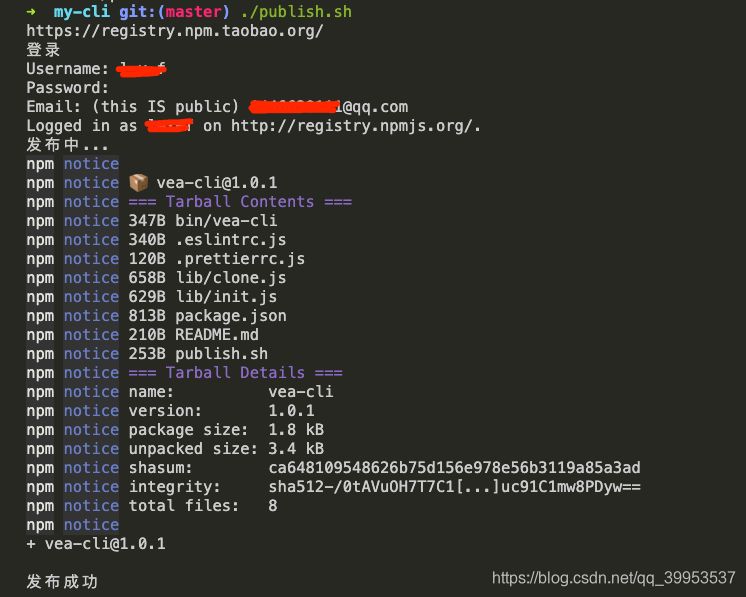
./publish.sh 执行成功后的显示
6.发布完成后测试
1 | npm i -g vea-cli |
如果没有这个包的话看一下,npm 源是不是http://registry.npmjs.org,taobao源同步有时差
7.实现效果

8.发布后取消或删除 npm 包
强制取消,仅允许最近 72 小时内发布的版本取消发布
1 | npm unpublish --force |
删除已经发布好的包
1 | npx force-unpublish package-name '原因描述' |
参考链接
1.https://github.com/sindresorhus/ora
2.https://blog.csdn.net/qq_26733915/article/details/80461257
3.https://github.com/vuejs/vue-cli
4.https://github.com/chalk/chalk
5.https://github.com/ianstormtaylor/download-github-repo
